
Generating documentation with sphinx
The pdoc module that we used in the last lesson was nice, but more sophisticated options are available. Many of the documentation pages that you may have viewed (such as scipy, numpy, or astropy), use the Sphinx python documentation generator. Not only will Sphinx generate documentation from your docstrings, but it will also allow you to write documentation in reStructuredText which can then be rendered into HTML, PDF, ePub, and other document formats. For publishing code to a website such as readthedocs, Sphinx is an essential choice.
Creating documentation from our docstrings
The documentation work that we have done on the test module will not be wasted. Sphinx understands a range of documentation styles and can fairly reliably auto-detect which one you are using (even if you change throughout your project!).
To begin using Sphinx we need to install it via pip. It is recommended that we use a dedicated directory for our documentation (docs/). Once Sphinx is installed we initialise our documetaion using the sphinx-quickstart command.
pip install -U sphinx
mkdir docs
cd docs
sphinx-quickstart
We’ll be taken through a sort of install wizard with a few questions as follows. (bold are the answers that have been used for the example project).
Welcome to the Sphinx 4.3.1 quickstart utility.

Please enter values for the following settings (just press Enter to
accept a default value, if one is given in brackets).

Selected root path: .

You have two options for placing the build directory for Sphinx output.
Either, you use a directory "_build" within the root path, or you separate
"source" and "build" directories within the root path.
> Separate source and build directories (y/n) [n]: y

The project name will occur in several places in the built documentation.
> Project name: SkySim
> Author name(s): Dev One
> Project release []: v3.0

If the documents are to be written in a language other than English,
you can select a language here by its language code. Sphinx will then
translate text that it generates into that language.

For a list of supported codes, see
https://www.sphinx-doc.org/en/master/usage/configuration.html#confval-language.
> Project language [en]:

Creating file /data/alpha/hancock/ADACS/MAP21B-Training-BPindor/docs/source/conf.py.
Creating file /data/alpha/hancock/ADACS/MAP21B-Training-BPindor/docs/source/index.rst.
Creating file /data/alpha/hancock/ADACS/MAP21B-Training-BPindor/docs/Makefile.
Creating file /data/alpha/hancock/ADACS/MAP21B-Training-BPindor/docs/make.bat.

Finished: An initial directory structure has been created.

You should now populate your master file /data/alpha/hancock/ADACS/MAP21B-Training-BPindor/docs/source/index.rst and create other documentation
source files. Use the Makefile to build the docs, like so:
   make builder
where "builder" is one of the supported builders, e.g. html, latex or linkcheck.
For most of these questions you can choose whatever answers you like, however separating the build/source directories for your documentation is recommended. Separate build/source directories make it easier to keep the documentation source under version control.
The setup will create the following file structure:
docs/
├── build
├── make.bat
├── Makefile
└── source
    ├── conf.py
    ├── index.rst
    ├── _static
    └── _templates
If we move into the docs/ directory and type make html Sphinx will generate some documentation for us. The documentation will be a set of static .html files in the build/ directory. Open docs/build/index.html in your web browser to view them. At the moment there is no content, just a few links to empty or broken pages.
The reason that the website is empty is because we have a very spare docs/source/ directory. What we are seeing is simply the result of the index.rst page being rendered. In order to extract the docstrings from our module, and build the html documentation we have to edit some of the sphinx settings.
In the file socs/source/conf.py there are a lot of options that are set to default values. The answers that you chose in the initialisation stage are also in this file in case you need to change them (for example the release number).
# Add any Sphinx extension module names here, as strings. They can be
# extensions coming with Sphinx (named 'sphinx.ext.*') or your custom
# ones.
extensions = ['sphinx.ext.autodoc',
              'sphinx.ext.mathjax',
              'sphinx.ext.viewcode',
              'sphinx.ext.napoleon',
             ]

...

html_theme = 'sphinx_rtd_theme'
The extensions setting enables different sphinx extensions. See the sphinx extensions page for a list of what modules are available and what they do. The html_theme sets the theme for the website. Here we have chosen the sphinx_rtd_theme which renders the page using the default read the docs theme. If you want to explore more themes then you should visit the sphinx-themes gallery.
Some of the sphinx extensions (including the theme chosen here) require additional modules to be installed. Normally we would put these required modules in the requirements.txt file for our project. However, the documentation is typically only going to be built by developers (and automation scripts) and not end users, so instead we create a new file docs/requirements.txt that will list all the dependencies for building the documentation. Note that the theme sphinx_rtd_theme is provided by the sphinx-rtd-theme module (replacing _ with -).
Now that we have the autodoc extension enabeled, we just need to update the website to include this feature. In the docs/source/index.rst file we can add the following:
Modules
=======

.. automodule:: skysim.sim
   :members:
With the extra extensions installed and the index updated we can now run make html again and see the updated documentation web pages.
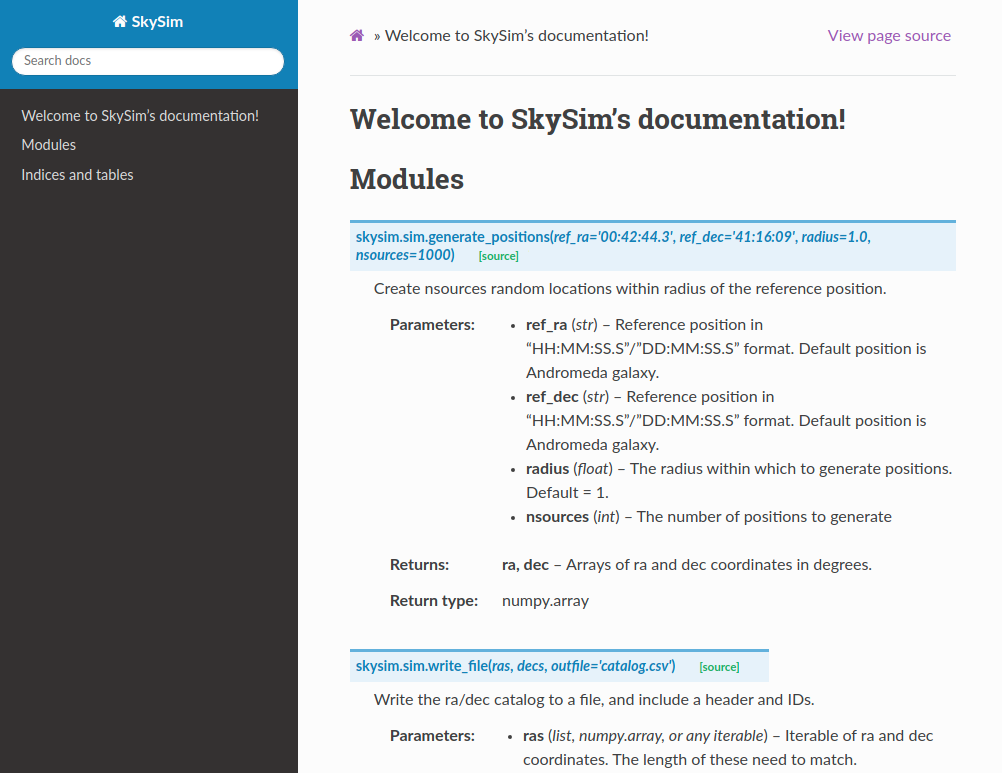
We now have a way of turning all our module/class/function docstrings into documentation.
At this point we have generated documentation that would be useful to people who are either developing this module, or who are importing it for use in their own software. Essentially we are just documenting the API for this software.
Cross-linking your docstrings
Sphinx provides a mechanism that will allow you to make links between different parts of your documentation. Two main uses for this are for your “see also” section, where you would link to similar functions/modules, or in your parameter descriptions where you want to say that a parameter is some custom object type.
To make these links you simply use back-tics around the module/function/class you want to reference. Note that in our documentation for skysim.sim.generate_positions we indicate that the ra/dec return variables are of type numpy.array. At the moment this is treated as just a string, however we can link it to the numpy documentation by using the extension called intersphinx.
To enable intersphinx we update the extensions part of the conf.py file, and then add a new parameter called intersphinx_mapping as shown below.
# Add any Sphinx extension module names here, as strings. They can be
# extensions coming with Sphinx (named 'sphinx.ext.*') or your custom
# ones.
extensions = ['sphinx.ext.autodoc',
              'sphinx.ext.mathjax',
              'sphinx.ext.viewcode',
              'sphinx.ext.napoleon',
              'sphinx.ext.intersphinx',
              ]

# Add mappings
intersphinx_mapping = {
   'numpy': ('https://numpy.org/doc/stable', None),
   'python': ('http://docs.python.org/3', None),
}
To make links we use back-tics around the module/function/class you want to reference:
def generate_positions(ref_ra='00:42:44.3',
                       ref_dec='41:16:09',
                       radius=1.,
                       nsources=1000):
    """
...

    Returns
    -------
    ra, dec : :obj:`numpy.array`
        Arrays of ra and dec coordinates in degrees.
    """
We can also link to other functions/classes within our module using :func:`skysim.sim.generate_positions`.
Creating additional documentation
By default Sphinx can render any document that is in reStructuredText format. In the docs/source directory you’ll see a file index.rst which has been auto-generated by Sphinx. This file will contain some content and directives for generating content.
Initially the table of contents is empty and not shown on the main page, and the left pane just shows the section headers for the current page. The content on the main page has been generated from all the docstrings in your module(s). In order to include additional documentation you can add your own content pages and link to them from here.
Create a new file called docs/source/example.rst, and then add some content. Save the file. Now edit the docs/source/index.rst to link to this page by making the following change (shown in bold):
Welcome to MyProject's documentation!
=====================================

.. toctree::
   :maxdepth: 2
   :caption: Contents:

   example
You can now build an entire website using this strategy. You can link to pages using :ref:`page_name`, where `page_name` is the name of the file/page.
Using markdown
If you don’t like rst, and would prefer markdown you can write markdown for your custom pages. This is particularly useful if you already have pages in markdown format (e.g. from an existing wiki).
The extension to use is a third party extension called myst_parser. We can install it with pip install myst-parser, and then enable it in the conf.py as follows:
# Add any Sphinx extension module names here, as strings. They can be
# extensions coming with Sphinx (named 'sphinx.ext.*') or your custom
# ones.
extensions = ['sphinx.ext.autodoc',
              'sphinx.ext.mathjax',
              'sphinx.ext.viewcode',
              'sphinx.ext.napoleon',
              'sphinx.ext.intersphinx',
              'myst_parser',
              ]

# mappings for parsing files
source_suffix = {'.rst':'restructuredtext',
                 '.md':'markdown'}
The source_suffix provides sphinx with a way to determine what format to use when parsing the different file types.
Summary
You should now be able to create documentation from the docstrings of your module, and from additional .rst or .md files that provide more of a user guide style.
Once you have a set of documentation that you are happy with, you can host them at readthedocs.org. See the tutorial for instructions on how to do this.