
Creating a GitHub repository
At the moment we have a bunch of code, documentation, and associated files. We wish to make these available to others in the easiest way possible. We could just zip them all up and email to collaborators. However this means that collaborators no longer benefit from any future development that you do, and even worse, will start asking questions about code that may have diverged from the version you are working on. A solution to this problem is to keep all your code under version control, and to make use of one of the many free, online repositories to host a copy of the code. For this lesson we’ll focus on GitHub, but gitlab and bitbucket are also good alternatives.
Create an account on Github
Github accounts are free, you just need an email address to sign up. Since some academic institutions shut off your email address promptly when your contract ends, it may be a good idea to use a non-institutional or personal email to sign up to github or other services that will outlast your current contract.
Create a new repository on Github
Go to Github and sign in. You should be taken to a page which has a listing of your repositories and a green button to create a new one. Click the button and you should see a screen similar to the following.
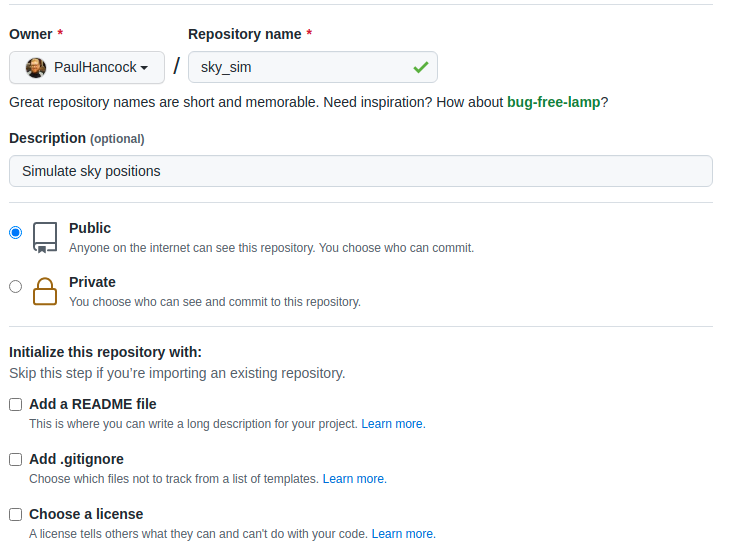
For now, lets create a truly empty repository so don’t select any of the last three boxes. Just give the repo a name (your project name is a good choice if available). You can change the description later or fill it in now.
Once you create the repository you’ll see a set of instructions about what to do next.
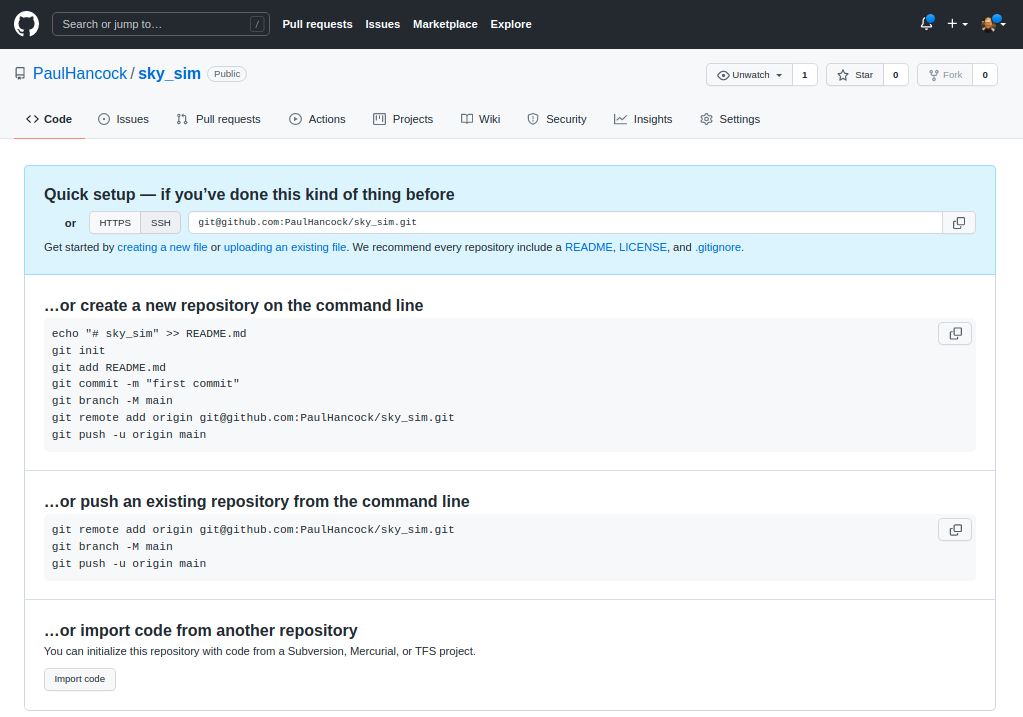
Now we are going to go with “create a new repository from the command line”.
The first part is to make a new local git repository using init / add / commit and to name the branch to be main (instead of master).
git init
git add README.md
git add requirements.txt encironment.yml
git add sim_catalog skysim/*.py
git commit -m "first commit"
git branch -M main
The next step is to link your local repository with the one that you just created on Github. Replace PaulHancock/sky_sim.git with your username and the name of the repo that you chose.
git remote add origin git@github.com:PaulHancock/sky_sim.git
git push -u origin main
After you have done the git push you’ll have added all your local changes to the remote repository and you can view the new state of the project on Github. Note how your README.md file gets rendered into a nice splash page.
When you push to origin main you’ll have to authenticate with Github, see here for instructions on how to set that up for ssh.
If you set your repository to be public then anyone on the internet can see and download your code, they can make a fork (copy) of it to work on themselves, and can even send feature requests or bug reports via the issue tracker. We will get into those features later, but for now all you need to do is let your collaborators know that your code is available on Github, send them the link, and then they can download/clone it as needed. An added bonus is that as you make changes to your code, and then add/commit/push these changes, your collaborators can then pull those changes and get the updates without having to bug you about it.